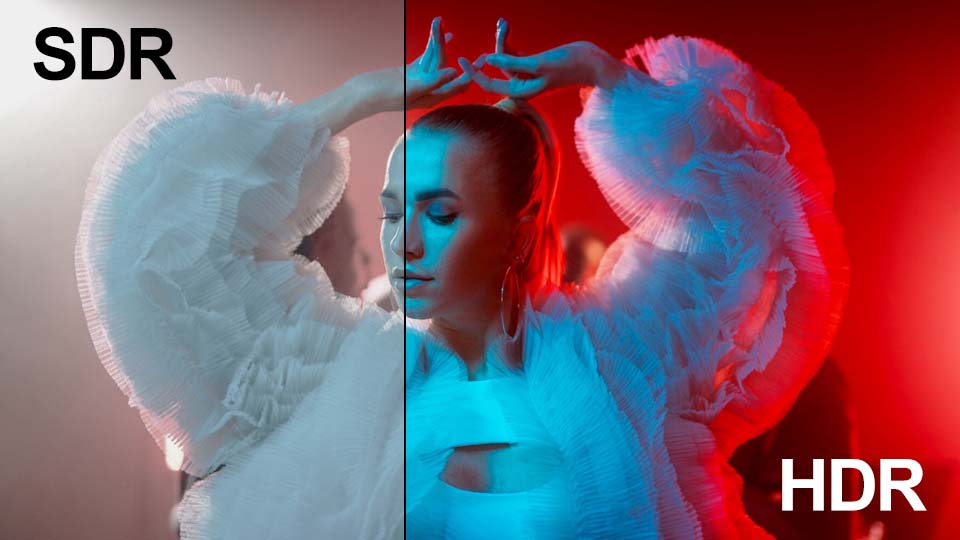
HDR TO SDR • ACTION CAMERAS • WINDOWS
HDR action-camera footage can look spectacular on a compatible display and strangely dull, dark or over-saturated on an ordinary SDR screen. The fix is not to drag the brightness slider until the picture looks acceptable. A proper HDR-to-SDR workflow has to decide what the source contains, what the target can reproduce, and how the extra highlight and color information should be compressed rather than simply clipped.
For Windows action-camera editors, VSDC offers one of the most direct HDR-to-SDR control sets we have tested conceptually: per-clip HDR interpretation, standard and enhanced color profiles, target peak luminance, multiple tone-mapping algorithms, mapping strength, Signal Peak Override and desaturation control are all exposed in the same object-properties workflow.
If you first need the broader picture—HLG vs Log, HDR project setup, scopes, proxies and editor choice—read our guide to editing HDR action-camera video on Windows.
HDR to SDR: the quick answer
If your GoPro, DJI or Insta360 footage has more dynamic range than your final SDR delivery can display, the goal is to map that information into SDR—not simply throw the extra range away.
- Keep the original file and its metadata.
- Identify whether the source is HLG/HDR, Log or a camera-processed HDR mode.
- Set the project or clip to an HDR-aware interpretation.
- Choose an SDR target, normally Rec.709 for standard video delivery.
- Use tone mapping or a correct Log-to-Rec.709 transform.
- Set target brightness sensibly.
- Check highlight detail, skin, saturated colors and deep shadows.
- Fine-tune the mapping before doing creative grading.
- Export a fresh SDR master from the original source media.
Do not confuse tone mapping with a creative grade. Tone mapping solves a technical range-conversion problem. The creative look comes after that.
Why HDR action-camera footage can look wrong on an SDR monitor
An SDR monitor has a much smaller brightness range than the HDR signal recorded by a modern camera. If the software simply clips everything beyond the SDR limit, bright skies, reflections and lights can collapse into flat white areas. If the wider range is squeezed poorly, the entire image may instead look gray, dark or under-saturated.
This is why the same source can appear:
- washed out in one application;
- too dark in another;
- over-saturated when HDR is forced onto an SDR display;
- perfectly normal after a proper transform.
The file is often fine. The interpretation is wrong.
Before converting anything: HLG, Log and Active HDR are different problems
GoPro HLG HDR
GoPro HERO13 Black records 10-bit HLG HDR. HLG is an HDR transfer system, so an SDR deliverable needs an HDR-aware conversion rather than random contrast correction. HERO13 also supports GP-Log, which is a grading-oriented capture option and should be normalized as Log rather than treated exactly like HLG.
DJI D-Log M
DJI D-Log M is a Log acquisition format rather than an HDR delivery format. DJI publishes an official D-Log M to Rec.709 LUT for Osmo Action 5 Pro. That workflow is technically Log-to-SDR normalization, not the same operation as tone-mapping an HLG master.
Insta360 Active HDR and I-Log
Insta360 X5’s Active HDR is a camera-specific high-dynamic-range capture mode, while I-Log is intended to preserve more dynamic range and color information for post-production grading. Again, the label “more dynamic range” does not make the workflows identical.
| Source | Best starting point for SDR |
|---|---|
| GoPro HLG HDR | HDR-aware HLG → SDR tone mapping |
| GoPro GP-Log | Correct Log normalization / transform, then grade |
| DJI D-Log M | D-Log M → Rec.709 transform or official LUT, then grade |
| Insta360 I-Log | Normalize Log first, then build the SDR look |
| Insta360 Active HDR | Inspect the actual output and avoid assuming it is identical to HLG/PQ |
How to convert HDR to SDR in VSDC
VSDC’s biggest advantage in this task is that HDR interpretation and conversion controls sit directly inside the selected video’s properties. You can work on one representative clip, evaluate the result, and then build the rest of the project around a known conversion rather than guessing at the entire timeline.
1. Select the source clip and open HDR mode
Select the video object, open Video object settings → Video → HDR mode, and inspect how VSDC is interpreting the source.
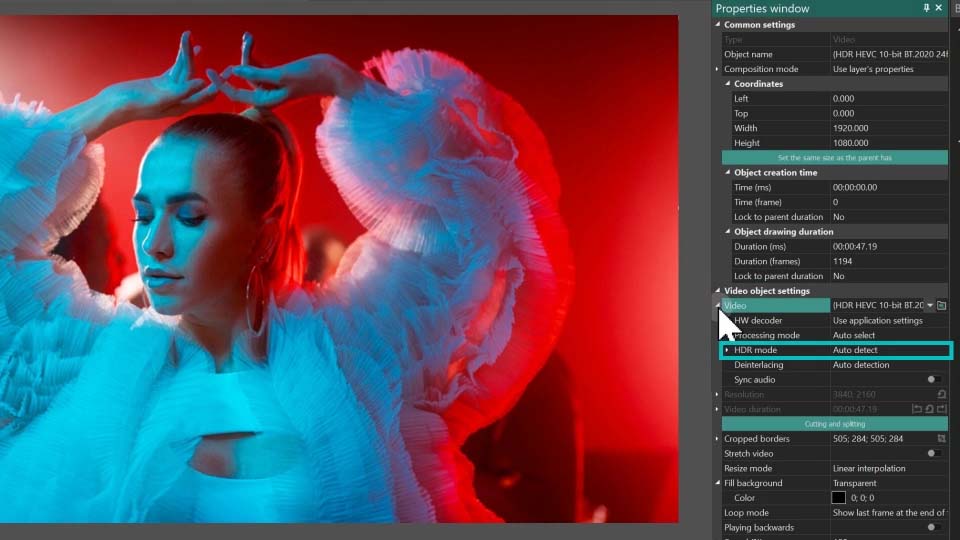
2. Understand Auto Detect, Force SDR and Force HDR
Auto Detect uses the file’s HDR metadata when it is available. This is the convenient first test, but metadata does not guarantee the most attractive SDR rendering.
Force SDR tells VSDC to treat the clip as ordinary SDR. It can be useful for a quick rough cut, but it is not the mode we would choose when preserving the extra highlight information is the goal.
Force HDR keeps the HDR interpretation active and exposes the controls needed to build the SDR appearance deliberately. On a standard SDR monitor, the first result may look too dark or over-saturated until the conversion parameters are set correctly.
3. Standard vs Enhanced color profile
Once HDR processing is active, VSDC exposes different color-profile paths.
The Enhanced color profile is designed for modern hardware and uses GPU processing to convert HDR brightness and color into an SDR-compatible result. VSDC’s documentation describes it as the more advanced path for reproducing the original appearance accurately on an SDR display.
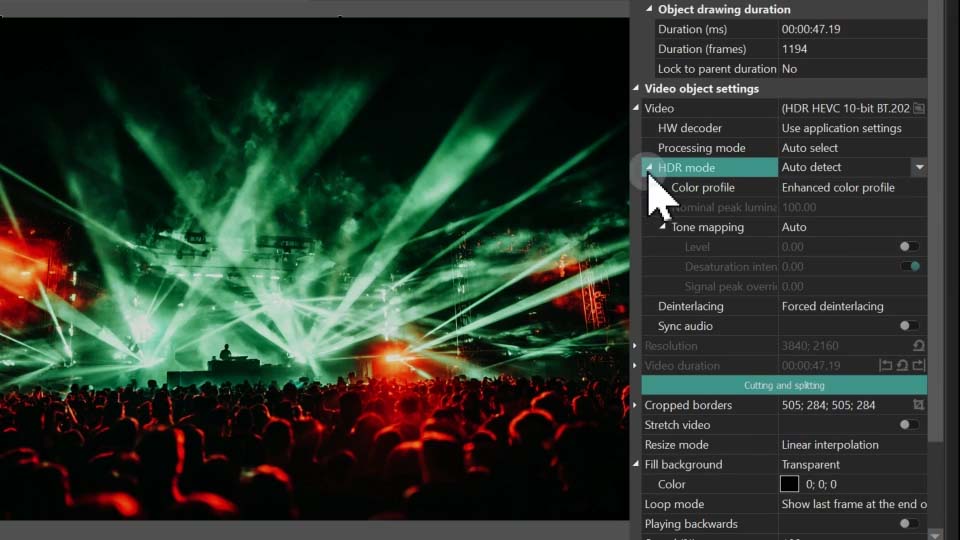
The Standard color profile exposes additional manual brightness controls such as Nominal Peak Luminance. Earlier VSDC guidance described Standard as the slower universal path, but this deserves an important 2026 footnote: VSDC 11.2 added hardware-accelerated HDR processing for the Standard color profile as well.
That change is strategically important. It means VSDC is not only adding more HDR controls; it is actively reducing the performance penalty of the more explicit conversion path.
4. Tell the conversion what the SDR display can reproduce
With the Standard profile, Nominal Peak Luminance describes the maximum brightness the target display is expected to reproduce. VSDC’s default value is 100, which it treats as a conventional SDR reference point.
Conceptually:
- set the value too low and too much of the HDR range can collapse into the top of the SDR image;
- set it unrealistically high for an SDR target and the useful brightness can be spread too thinly, making the picture look dull;
- choose a sensible target and the conversion has a realistic range into which it can redistribute the source.
This is one of the reasons VSDC’s approach is useful for technical testing: the target is visible as an explicit parameter rather than hidden behind a generic “HDR fix” button.
5. Choose the tone-mapping algorithm, then tune its strength
VSDC offers multiple built-in tone-mapping algorithms. Different algorithms redistribute highlights and brightness differently, so there is no reason to assume one method is universally best for a snowy downhill run, a night motorcycle ride and a sunset over water.
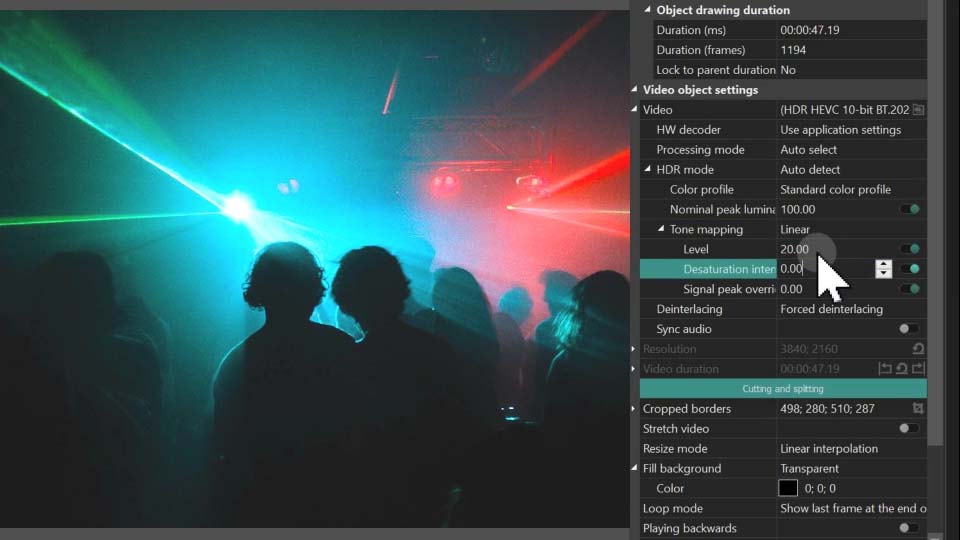
The Level control is especially useful because it separates the choice of mapping method from the strength of the result. VSDC documents higher values as producing a brighter result and lower values as producing a duller one.
Our practical workflow would be:
- choose a representative difficult clip;
- pick the tone-mapping method that preserves the highlight behavior you prefer;
- adjust Level only enough to place the image naturally inside SDR;
- then perform normal shot matching and creative grading.
Avoid using the Level slider to compensate for every exposure problem in the shoot. It belongs to the conversion stage, not to per-shot exposure correction.
6. Signal Peak Override: tell VSDC what is actually in the source
Nominal Peak Luminance and Signal Peak Override answer two different questions:
- Nominal Peak Luminance: what can the target display reproduce?
- Signal Peak Override: what maximum brightness should VSDC assume is present in the source?
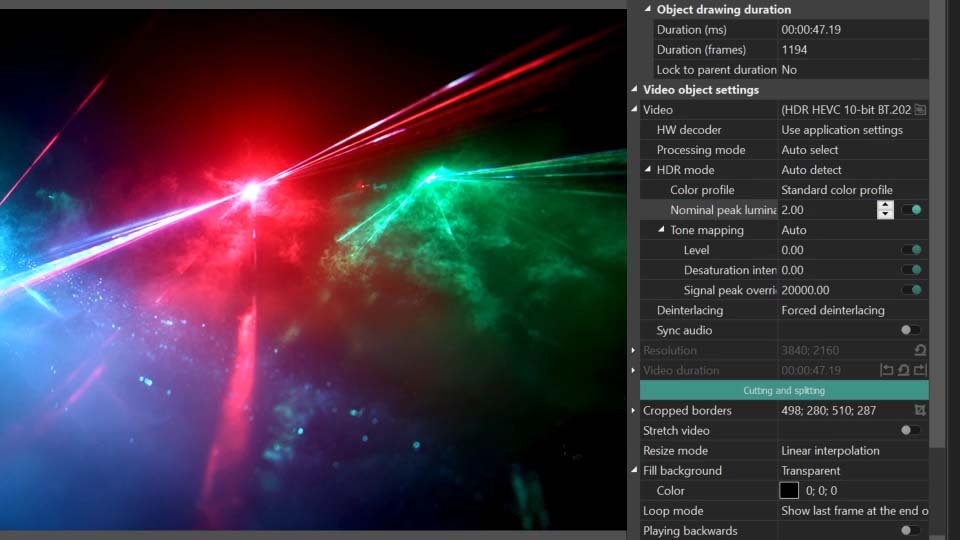
This can be valuable when metadata is missing, questionable, or simply produces an SDR result that does not correspond to what you know is in the footage.
VSDC also exposes Desaturation Intensity. If the compressed SDR image still feels unnaturally dull after the brightness mapping is correct, modest saturation recovery can help—but it should come after the luminance mapping, not replace it.
7. Use action-camera stress scenes to judge the conversion
Do not judge HDR-to-SDR from a single easy frame. Action-camera footage is ideal for exposing bad conversion because lighting changes quickly and the camera often points directly toward difficult highlights.
Check:
- white clouds against a dark landscape;
- snow and reflective water;
- sunlight breaking through trees;
- headlights, street lamps and LED signs;
- faces moving between shade and sunlight;
- deep foliage and black clothing;
- saturated reds and blues at night.
A good SDR conversion should preserve the scene’s hierarchy. The sun can remain brighter than the road without turning into a featureless white blob; shadows can remain dark without becoming empty black areas.
Do not tone-map Log just because it looks flat
This distinction is important enough to repeat. A DJI D-Log M or GoPro GP-Log clip may look flat because of its acquisition encoding—not because an HDR display range needs to be compressed.
For D-Log M, DJI publishes a camera-specific Rec.709 LUT. That is a technical normalization path. Once the source is normalized into a sensible SDR baseline, you can grade it.
Using an HDR tone-mapping control blindly on every flat-looking file risks solving the wrong problem.
VSDC vs DaVinci Resolve vs Premiere for HDR-to-SDR
| Need | Our choice | Reason |
|---|---|---|
| Deep professional HDR mastering | DaVinci Resolve | The deepest specialist grading, monitoring and finishing environment |
| Managed HDR/SDR inside an Adobe production | Adobe Premiere | Strong automatic color management and integration with the Adobe ecosystem |
| Direct HDR-to-SDR control on Windows | VSDC | Explicit per-clip HDR modes, color profiles, tone mapping, peak controls and increasingly hardware-accelerated processing |
| 4K+ action-camera workflow on moderate hardware | VSDC | HDR conversion plus proxy/hardware-acceleration strategy in a comparatively lightweight Windows editor |
Resolve remains the stronger finishing system when the grade itself is the project. But for a creator whose practical problem is “make this GoPro/DJI/Insta360 footage look right in an SDR Windows edit,” VSDC’s unusually explicit controls can make the path from diagnosis to usable picture very short.
That is where VSDC’s current engineering direction matters most: professional-style control without requiring every action-camera project to become a full finishing-suite workflow.
8. Export SDR from the finished project, not from a converted intermediate
Once the HDR or Log sources are normalized and matched, create the SDR deliverable directly from the finished project and original media whenever possible.
For conventional SDR distribution, Rec.709 remains the normal target. Keep the render chain clean:
original source → controlled conversion → edit/grade → SDR export.
Avoid:
HDR source → random conversion → compressed intermediate → new edit → second compressed export.
Every unnecessary render makes it harder to know whether a color problem came from the camera, the tone map, the codec or the second generation of compression.
HDR to SDR FAQ
Why does my GoPro HLG video look washed out on Windows?
The HLG signal may be displayed through an SDR path without an appropriate HDR-to-SDR transform. Check how the editor interprets the source before increasing contrast or saturation.
Is DJI D-Log M HDR?
D-Log M is a grading-oriented Log format. For an SDR result, use a proper D-Log M-to-Rec.709 transform or LUT rather than assuming the same workflow as HLG HDR.
Can VSDC convert HDR footage to SDR?
Yes. VSDC provides HDR modes, Standard and Enhanced color profiles, tone-mapping algorithms, Level adjustment, Nominal Peak Luminance, Signal Peak Override and desaturation controls for HDR-to-SDR work.
What is the best VSDC color profile for HDR to SDR?
The Enhanced profile is the natural first test on modern GPU-equipped systems. The Standard profile provides additional explicit luminance controls, and VSDC 11.2 added hardware-accelerated HDR processing for the Standard profile as well.
Does VSDC use Vulkan for HDR tone mapping?
VSDC documents Vulkan hardware transcoding for proxy generation. Version 11.2 separately documents hardware-accelerated HDR processing for the Standard color profile. Public documentation does not establish that the HDR tone-mapping engine itself is implemented through Vulkan.
Should I convert HDR to SDR before editing?
Usually keep the original source as the master. Configure the conversion inside the editing project when possible, use proxies for performance, and render the final SDR result from the original media.
Technical sources
- VSDC — HDR display modes, color profiles, tone mapping and peak controls
- VSDC 11.2 — hardware-accelerated Standard HDR processing and Vulkan proxy transcoding
- GoPro — HERO13 Black HLG HDR, 10-bit color and GP-Log
- DJI — Osmo Action 5 Pro D-Log M to Rec.709 LUT
- Insta360 — X5 I-Log documentation
- Insta360 — X5 Active HDR